Expert Tips to Troubleshoot Plotters for Vinyl Wraps
Introduction:
Vinyl cutting is a popular technique for creating precise shapes on different media. To get the best results, consider force, speed, blade type, and sheet alignment. This guide helps troubleshoot common issues and provides step-by-step guide for perfect vinyl cutting.
1. Media Selection and Bubble-Free Cutting
Make sure the vinyl or media you choose is free from bubbles. Bubbles can mess up the cutting process. Check the vinyl carefully before cutting and avoid using damaged or wrinkled sheets. Use a squeeze to remove bubbles from media.
2. Modifying Force and Speed
Adjust the force and speed based on the type of media. Thicker sheets need higher force and speed (around 28-34) with a 60-degree blade, while thinner vinyl requires lower force (approximately 12-15). You have to test with different settings and find a sweet spot for your vinyl type.

3. Blade Selection
Pick the right blade depending on the media's texture. For raised textures, use a 60-degree blade. For smooth vinyl, a 45 or 30-degree blade is good enough.

4. Sheet Alignment
Ensure precise cutting by placing the vinyl sheet under the push rollers. Align it both vertically and horizontally to avoid misalignment problems.

5. Test Force for new Media
Before cutting any sheet for the first time, do a test cut. This helps find the perfect force setting. Keep adjusting the force until you achieve clean and accurate cuts.
6. Clean Push Rollers and Grip
Keep the push rollers and grip area clean always. Regularly remove dust and small vinyl pieces to prevent cutting issues.
7. Check CutFile Dimensions
Always double-check the downloaded file size with the supplier's dimensions. Accurate measurements prevent wastage of time and vinyl.

8. Size Comparison before Pasting
Before pasting the vinyl cut, check its size against the original dimensions from the file. Make sure the cut size matches the intended dimensions to avoid fitting problems.
9. Blade Maintenance
Clean the blade's to maintain cutting quality. Remove any vinyl pieces and dust before using it. A clean blade ensures smoother cuts and better results. As time passes, blades may lose efficiency in cut size and shape. In such cases, either increase the force slightly or replace the blade for consistent results.

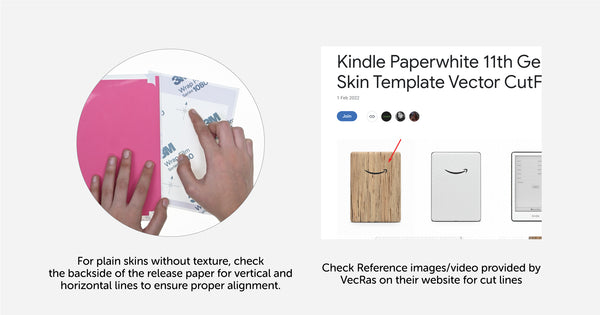
10. Vertical and Horizontal Cut (Crucial)
When it's time to send the final cutfile, ensure it matches both the file and the reference images/video provided by VecRas on their website. If the image displays vertical lines on the skin, cut the file vertically. Likewise, if the lines on the image are horizontal, cut the file horizontally as represent in the image. For plain skins without texture, check the backside of the release paper for vertical and horizontal lines to ensure proper alignment.
Conclusion:
By adhering to these instructions, you can rectify typical issues encountered while using Vinyl Plotters & CutFiles. Attaining flawless, precise, and refined outcomes is easy by employing the appropriate Force, Speed, Blade type, and equipment upkeep.


Leave a comment